To create the graphics for your template, you can use any of your own creations or obtain permission from designers that make digital clipart or any other digital designs. I like to use digital scrapbook kits. In my sidebar are listed the digital designers that I have used for my free designs. I have permission to use their designs because I have paid the commercial license fees they required. If you find a design on the web, make sure that you check the designer's terms of use and/or email the designer to verify their permission for you to use their designs. This is especially true if you have a commercial blog and/or make any income from your blog.
Once you have graphics for your template design, you need to decide what graphics editing program you will use. I recommend either Photoshop Elements or Pixlr.com. If you are fine with a simple design, Pixlr is the way to go. If you want something more detailed, I would use something better like Photoshop Elements.
Once you have graphics for your template design, you need to decide what graphics editing program you will use. I recommend either Photoshop Elements or Pixlr.com. If you are fine with a simple design, Pixlr is the way to go. If you want something more detailed, I would use something better like Photoshop Elements.
1. BACKUP YOUR CURRENT TEMPLATE!
This tutorial can get complicated. If you make any mistakes, I am not liable, so backup your template before you do anything to your blog. Another good idea is to create an additional blog that you can practice on. That way, if anything goes wrong, your practice blog will be affected, but your real blog won't be ruined. Once you create your perfect template, you can download the HTML from the practice blog and then upload it to the blog you actually use.
2. CREATE A REPEATABLE BACKGROUND

To make this design, I cropped an image from a digital scrapbook kit that. This image will be tiled across the background of your blog so that it covers the entire screen. This type of background is best because the file size of this image can be very small. A small image size means that when a reader opens your blog, the background of your design will load very quickly. More intricate background designs can get very large and slow down the computers of your readers.
3. CREATE A HEADER, POST/SIDEBAR BACKGROUND AND FOOTER
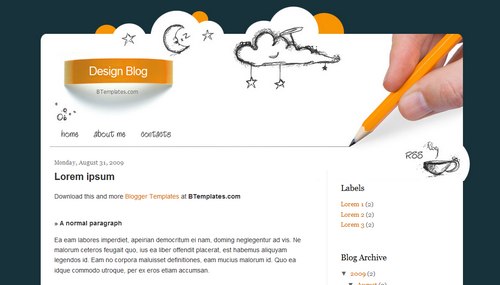
This type of design requires a specific type of header. This is a great example of a header below:

Notice that the header has the post/sidebar background attached to the bottom of it. This is necessary to give it the continuous look. Also, notice that the background behind the title is transparent. It is not white, it is transparent.
Carolynn at Makin' Cute Blogs has posted a video tutorial on how to make a similar design. She offers a video tutorial using Pixlr. The last video shows how to make the post/sidebar background. Here is her tutorial:
4. CHANGE YOUR BLOG TEMPLATE TO THE WHITE SIMPLETEMPLATE
This tutorial is based on the Blogger Simple template. There are 7 Simple Templates. Choose the last one, the one that is all white.
To choose this template, choose Template from the drop-down menu on your Blogger Dashboard. On this page, you will several templates listed at the bottom. Find the last Simple template and place your cursor over the image. You should see the words "Apply to Blog / Customize". Click "Apply to Blog".
5. ALTER THE HTML/CSS
Now it is time to add to and alter the HTML/CSS of your template to fit each of these design elements.
A. First, we are going to add some CSS:
i. Go to the Template page and click "Customize" so that you are in the Template Designer.
ii. Click "Advanced" from the menu on the left and then scroll down in the second menu until you see "Add CSS".
iii. Add the following code into the box:
.header {
width: 1040px;
}
.content-inner {
background: url('POST/SIDEBAR BACKGROUND DIRECT LINK HERE') repeat-y;
background-color:transparent;
background-position: 7px;
background-position: 7px;
padding-bottom:10px;
padding-left:40px;
padding-right:40px;
padding-top:10px;
width: 960px;
}
.footer-inner {
background: url('POST/SIDEBAR BACKGROUND DIRECT LINK HERE') repeat-y;
background-position: 7px bottom;
width: 960px;
}
.footer-outer {
background: url('FOOTER IMAGE DIRECT LINK HERE');
background-repeat: no-repeat;
background-position: 0px bottom;
border: 0px;
padding-bottom:160px;
width: 1040px;
}
B. Now we are going to alter the HTML.
i. Go to the Template page and click "Edit HTML". (You may want to backup your blog again before editing the HTML, just to be safe.)
ii. The first change is to move the HTML for the Header outside of the "content-inner" section of the blog. This will set the header above the main portion of the blog and allow it to have a transparent background. To do this:
Find the HTML that starts with <header> and ends with </header>. (Use Ctrl-F to find this section.)
Cut this section and move it from here (right below <div class='content-inner'>:

To right below <div class='content-outer'> (Use Ctrl-F to find this section.):

iii. Now we are going to move the Footer section outside of the main body of the blog, just like we did the Header.
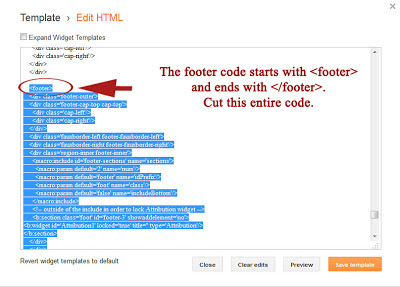
Find the HTML that starts with <footer> and ends with </footer>. (Use Ctrl-F to find this section.)
Cut this section and move it from here
Find the HTML that starts with <footer> and ends with </footer>. (Use Ctrl-F to find this section.)
Cut this section and move it from here
To right below
<!--content-->
</div>

This placed the footer section outside of the main section and allowed it to have a transparent background.
6. MAKE A FEW ADJUSTMENTS
After entering the code, you may find that your design elements do not line up as well as you would like. To do this, you alter the CSS code that you provided to make everything line up. It takes a lot of tweaking to get it right, but in the end you should end up with one continuous page without noticeable segments.
7. ADD EXTRA DESIGNS
The final step in creating your own custom template is adding extra design features such as a post icon, post divider, sidebar titles, blog button etc. There are several tutorials for these shown below:
Also, be sure to customize the fonts and colors on your blog in the Blogger Template Designer. Go to Advanced and then click on any of the options and use the fonts and colors that look best on your blog!
Thanks for using this tutorial. Leave a comment with a link to your blog. I'd love to see your custom designs!
- Krista Nelson


Thanks for sharing this super helpful guide. I really appreciate your effort.
ReplyDeleteHow to Curve Text In Pixlr